
This article is based off 4.4.3 of Angular Universal and 4.4.3 Angular.
Angular Universal can help you improve SEO, perceived performance, and even in some cases page load performance itself.
Getting started isn’t difficult. It’s powerful but it’s not magic. The goal of this guide is not only to get you started but to give you a deeper understanding of how Angular Universal works. This guide takes you from zero to universal with these steps:
- Create an minimal Angular build with the CLI.
- Configure the CLI to create a universal bundle.
- Set up a server.
- Generate Angular Universal content per route.
- Configure serving for static files.
There’s some tedious configuration in the beginning, but then it’s smooth sailing. Open up a terminal. Let’s begin.
Angular Universal is two parts
Angular Universal isn’t a command-line tool. It’s more than running a command to “sprinkle in” server-side rendering. Angular Universal changes how you build, deliver, and load your site. To take advantage of Angular Universal you need to understand the big picture. Angular Universal is two parts: a universal bundle and a server.
Part One: The universal bundle
Your Angular code won’t run on a server out-of-the-box. The module format is incorrect and your code may be coupled to the browser. To get your code running on a server you need a universal bundle.
A universal bundle is a build of your site converted for a commonjs environment like nodejs. The import statements turn into require() functions and any browser dependent code will break your server-side rendering.
The browser’s DOM is not available on the server. Angular uses a browser independent implementation of the DOM: domino. This indepent solution gives you basic DOM support, but it can’t do everything the browser does. You’ll have to cut any code that directly manipulates the DOM or uses browser API’s unsupported by domino. I’ll cover this in a later blog post.
The good news is the Angular CLI makes this easy. The bad? This is where the tedious config starts.
Install the Angular CLI
Avoid version pain. Make sure you at least have version 1.3.0 of the CLI installed. This article uses version 1.4.2.
npm i -g @angular/cli
Set up a minimal project
Use the CLI to create a new project. The CLI provides a command that creates an Angular project with a minimal setup.
ng new ssr-project --minimal
Install platform server
Angular Universal works through the @angular/platform-server module. It doesn’t come with the Angular CLI setup. You need to install it separately.
npm i @angular/platform-server --save
Make sure you’ve installed the same version as the other Angular modules. The CLI may install an older version of Angular such as 2.4.2 and the @angular/platform-server install may install a newer version. A mismatch of Angular module versions is going to give you a bad time later on. Go to the package.json and make sure every @angular module is on the same version. This article uses Angular 4.4.3.
{
  "name": "ssr-project",
  "version": "0.0.0",
  "license": "MIT",
  "private": true,
  "dependencies": {
    "@angular/animations": "^4.4.3",
    "@angular/common": "^4.4.3",
    "@angular/compiler": "^4.4.3",
    "@angular/core": "^4.4.3",
    "@angular/forms": "^4.4.3",
    "@angular/http": "^4.4.3",
    "@angular/platform-browser": "^4.4.3",
    "@angular/platform-browser-dynamic": "^4.4.3",
    "@angular/platform-server": "^4.4.3",
    "@angular/router": "^4.4.3",
    "core-js": "^2.4.1",
    "rxjs": "^5.4.2",
    "zone.js": "^0.8.14"
  },
  "devDependencies": {
    "@angular/cli": "1.4.3",
    "@angular/compiler-cli": "^4.4.3",
    "@angular/language-service": "^4.4.3",
    "typescript": "~2.3.3"
  }
}
Make the browser module aware of a server transition
Open src/app/app.module.ts. Angular needs to know that this is a server-side rendered app. Use the BrowserModule.withServerTransition() method and provide a unique id. This method acts a generic interface between the client and the server. This allows Angular to do any specific processing to take over a server-side rendered site.
// /src/app/app.server.module.ts
import { BrowserModule } from "@angular/platform-browser";
import { NgModule } from "@angular/core";

import { AppComponent } from "./app.component";

@NgModule({
  declarations: [AppComponent],
  imports: [BrowserModule.withServerTransition({ appId: "ssr-app" })],
  providers: [],
  bootstrap: [AppComponent]
})
export class AppModule {}
Create an AppServerModule
The browser needs an AppModule and the server needs one as well. This is a place where you can override or cancel-out any browser specific code for server compatibility.
Create the file src/app/app.server.module.ts.
// /src/app/app.server.module.ts
import { NgModule } from "@angular/core";
import { ServerModule } from "@angular/platform-server";

import { AppModule } from "./app.module";
import { AppComponent } from "./app.component";

@NgModule({
  imports: [AppModule, ServerModule],
  bootstrap: [AppComponent]
})
export class AppServerModule {}
Create an entry point for the server module
Each top-level Angular module needs an entry point file to start the application. Create a main.server.ts file an export the AppServerModule just like in main.ts.
// src/main.server.ts
export { AppServerModule } from "./app/app.server.module";
Set up the server module’s TypeScript configuration
At the point you’ve created the ServerModule and it’s entry point. However, there’s no TypeScript configuration to build it to JavaScript. You might be thinking, “Oh, I’ll just add it to the "files" array in the tsconfig.app.json.” There’s a big problem with that. The current configuration is uses the es2015 module setting and you need commonjs. The Angular compiler also needs to customize the configuration to know what the entry module is for Angular Universal. The easiest way to fix this by creating a specific server configuration: src/tsconfig.server.json.
{
  "extends": "../tsconfig.json",
  "compilerOptions": {
    "outDir": "../out-tsc/app",
    "baseUrl": "./",
    "module": "commonjs",
    "types": []
  },
  "exclude": ["test.ts", "**/*.spec.ts"],
  "angularCompilerOptions": {
    "entryModule": "app/app.server.module#AppServerModule"
  }
}
Tell the CLI how to build the universal bundle
The CLI is a big abstraction on Webpack. It knows how to build Angular, so it sets up the configuration and you command it. You may need to customize your configuration in certain cases. Creating a universal bundle is one of those cases.
Open the .angular-cli.json file. This file contains the default configuration options. To create a universal bundle you need to create a separater "app" entry. Add the following entry to the "apps" array.
/.angular-cli.json
{
  "platform": "server",
  "root": "src",
  "outDir": "functions",
  "assets": ["assets", "favicon.ico"],
  "index": "index.html",
  "main": "main.server.ts",
  "test": "test.ts",
  "tsconfig": "tsconfig.server.json",
  "testTsconfig": "tsconfig.spec.json",
  "prefix": "app",
  "styles": ["styles.css"],
  "scripts": [],
  "environmentSource": "environments/environment.ts",
  "environments": {
    "dev": "environments/environment.ts",
    "prod": "environments/environment.prod.ts"
  }
}
This configuration is the bow on all the hard work you’ve done so far. It tells the CLI that this “app” runs on a server "platform", has an entry file of main.server.ts and is built with the tsconfig.server.json configuration file.
Now build it
Use the CLI to specify that you want to build the server app entry.
ng build --app 1 --prod --output-hashing none
This should give you an output that looks something like this:
Date: 2017-09-26T12:39:17.053Z
Hash: 53b3312d5cbe854aac7c
Time: 4791ms
chunk {0} main.bundle.js (main) 7.13 kB [entry] [rendered]
chunk {1} styles.bundle.css (styles) 0 bytes [entry] [rendered]
Success! You have a universal bundle. What about those flags? The --prod flag minified and enabled AoT. The --output-hashing none flag removed any hashes from file names. These hashes are good for browser caching, but this makes them useless and frustrating on the server.
Speaking of servers, it’s time that you set one up.
Part Two: The server
A server is the second part of an Angular Universal app. The server is where you will use Angular’s @angular/platform-server. This module generates static HTML and CSS from the universal bundle.
There is an Angular Universal integration with .NET, but for this example you’re going to use a nodejs server. You’ve been writing in TypeScript this whole time so it won’t be too different.
Configure the server code for TypeScript
It’s not required to write the server code in TypeScript, but it’s useful. Create a server folder at the root of your project. Inside that folder create yet another configuration file: tsconfig.functions.json. You’ll use this configuration file to build your server code to the functions folder in a commonjs format.
{
  "compilerOptions": {
    "module": "commonjs",
    "target": "es2015",
    "outDir": "../functions"
  }
}
Build the browser app
There are two entries in your "apps" array. The one you created is for the server and the original one is for the browser. When the browser apps builds it stores the resulting files in the dist folder. Angular Universal requires the index.html document to generate the server-side rendered page. You need to build the browser app and move the index.html into the functions folder.
ng build --prod && mv dist/index.html functions
Install express
You’re going to use express.js as your server framework. It’s easy to use and has integrations across hosting platforms. You’ll also install a helper library: fs-extra.
npm i express @types/express fs-extra @types/fs-extra --save
Set up the express app
Create a file at server/index.ts. This file is this entry point to your server. Here you’ll create an express app, listen for requests, and use Angular Universal to generate HTML and CSS from your universal bundle.
// /server/index.ts
import "zone.js/dist/zone-node";
import * as express from "express";
import { enableProdMode } from "@angular/core";
import { renderModuleFactory } from "@angular/platform-server";
import * as fs from "fs-extra";

enableProdMode();

const app = express();
app.get("**", async (request, response) => {
  // Do magical Angular universal stuff here
});

const PORT = process.env.PORT || 3022;
app.listen(PORT, () => {
  console.log(`Listening on ${PORT}...`);
});
This server code does the following things:
- Imports zone.js: A node-specific version of zone.js. Things will totally break if you forget this.
- Imports express: This is the server framework.
- Imports Angular Universal: The
renderModuleFactoryfrom@angular/platform-server. This function is responsible for generating HTML and CSS from a universal bundle. - Creates an express app: An app is where you attach http handlers like:
GETandPOSTmethods. - Creates a greedy
**route: This route handles anyGETrequest to the server. - Launches the server: Uses a default port of 3022.
Require the assets for Angular Universal
You can now respond to all GET requests. To use Angular Universal you need to first get the assets it requires. This includes the universal bundle, the index.html, and the current url.
// /server/index.ts

import "zone.js/dist/zone-node";
import * as express from "express";
import { enableProdMode } from "@angular/core";
import { renderModuleFactory } from "@angular/platform-server";
import * as fs from "fs-extra";

const app = express();
app.get("**", async (request, response) => {
  // renderModuleFactory parameters
  const { AppServerModuleNgFactory } = require(__dirname + "/main.bundle");
  const document = await fs.readFile(__dirname + "/index.html", "utf8");
  const url = request.path;
  const options = { document, url };
});

const PORT = process.env.PORT || 3022;
app.listen(PORT, () => {
  console.log(`Listening on ${PORT}...`);
});
The additions you made do the following things:
- Requires the universal bundle: The
AppServerModuleNgFactoryis from the universal bundle. This is an AoT version of yourAppServerModule. A require is used because no module or type information is available for TypeScript to use. - Reads the
index.html: Angular Universal needs theindex.htmldocument. Using thefs-extralibrary you retrieve the file back as aPromise. - Retrieves the current url: Angular Universal also needs the url for the path you are trying to render. This helps it work with the router.
Server-side render your Angular app
Now you can get to the good part. Using Angular Unviersal to server-side render your app.
// /server/index.ts

import "zone.js/dist/zone-node";
import * as express from "express";
import { enableProdMode } from "@angular/core";
import { renderModuleFactory } from "@angular/platform-server";
import * as fs from "fs-extra";

const app = express();
app.get("**", async (request, response) => {
  // renderModuleFactory parameters
  const url = request.path;
  const { AppServerModuleNgFactory } = require(__dirname + "/main.bundle");
  const document = await fs.readFile(__dirname + "/index.html", "utf8");
  const options = { document, url };

  try {
    // generate the server-side rendered html
    const html = await renderModuleFactory(AppServerModuleNgFactory, options);
    response.send(html);
  } catch (e) {
    console.log(e);
    response.status(500).send("¯_(ツ)_/¯");
  }
});

const PORT = process.env.PORT || 3022;
app.listen(PORT, () => {
  console.log(`Listening on ${PORT}...`);
});
Angular Universal’s renderModuleFactory takes in the universal bundle and a set of options. In your case you provide the index.html document and current url as the options. This returns a promise containing the server-side rendered HTML if successful. If there’s an error you can catch it and send back a 500 status page.
Build and run the server
Build the server code to test your Angular Universal app.
node_modules/.bin/tsc -p server/tsconfig.functions.json
Now you can run the server.
node functions/index.js
Open the browser and view source
Open up the app in your favorite browser. If you’re running off the default Angular CLI project you should see something like “app Works!” on the screen. Right-click and view the source of the document. You should see the content of your app inside the source of the document like below:
<!DOCTYPE html>
<html lang="en">
  <head>
    <meta charset="utf-8" />
    <title>SsrProject</title>
    <base href="/" />
    <meta name="viewport" content="width=device-width,initial-scale=1" />
    <link rel="icon" type="image/x-icon" href="favicon.ico" />
    <link href="styles.hash.bundle.css" rel="stylesheet" />
  </head>
  <body>
    <app-root ng-version="4.4.3">
      <p>
        app Works!
      </p>
    </app-root>
    <script type="text/javascript" src="inline.hash.bundle.js"></script>
    <script type="text/javascript" src="polyfills.hash.bundle.js"></script>
    <script type="text/javascript" src="vendor.hash.bundle.js"></script>
    <script type="text/javascript" src="main.hash.bundle.js"></script>
  </body>
</html>
What if you don’t see your content?
If your source looks like your regular non-server-side rendered app then a few things may have happened. When Angular Universal encounters an unsupported DOM API or some error in your universal bundle it will return the default index.html. You’ll need to inspect any places where you could be directly accessing the DOM.
I’ve hit this error when I’ve used the PerformanceObserver API. One solution is to use the isPlatformBrowser helper function to guard against browser dependent code.
import { isPlatformBrowser } from "@angular/common";
Inspecting 404s
Inspect the Network panel in your browser’s DevTools. You’ll notice that you receive back a set of 404s. These are your static assets for your site. It’s the browser version of your app.
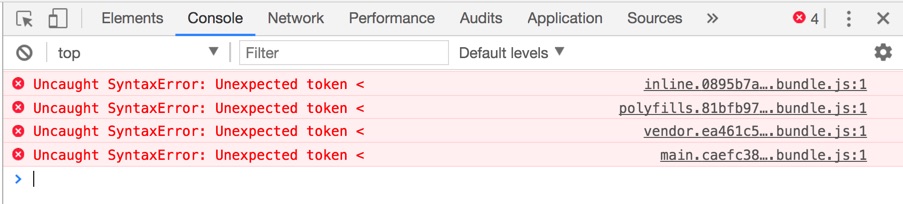
The only route is a ** greedy route. This means every single GET request is processed by this handler. When the browser requests your static assets the server will run Angular Universal for that url. For the / route this will generate the proper Angular Universal HTML.
However, when the browser requests a static asset like the vendor bundle this will cause an error. You receive the Unexpected token < error because the server is sending back the default HTML and not the browser bundle. The browser is expecting JavaScript and it’s getting HTML.
Delivering static assets
At this point you have a decision to make. You can either set up the server to deliver these static assets or serve them over a Content Delivery Network (CDN).
Delivering static assets from the server is simple. You need to change your configuration to build the browser app to the functions/dist folder.
{
  "root": "src",
  "outDir": "functions/dist",
  "assets": ["assets", "favicon.ico"],
  "index": "index.html",
  "main": "main.ts",
  "polyfills": "polyfills.ts",
  "test": "test.ts",
  "tsconfig": "tsconfig.app.json",
  "testTsconfig": "tsconfig.spec.json",
  "prefix": "app",
  "styles": ["styles.css"],
  "scripts": [],
  "environmentSource": "environments/environment.ts",
  "environments": {
    "dev": "environments/environment.ts",
    "prod": "environments/environment.prod.ts"
  }
}
This way the files are located with the server. Then all you need to do is use express’s static method to designate the dist folder as static. This ensures the files are not processed by the ** handler and are delivered “as-is”.
// /server/index.ts
import "zone.js/dist/zone-node";
import * as express from "express";
import { renderModuleFactory } from "@angular/platform-server";
import * as fs from "fs-extra";

const app = express();
// Assign a static directory
app.use(express.static(__dirname + "/dist"));
app.get("**", async (request, response) => {
  // renderModuleFactory parameters
  const url = request.path;
  const { AppServerModuleNgFactory } = require(__dirname + "/main.bundle");
  const document = await fs.readFile(__dirname + "/index.html", "utf8");
  const options = { document, url };

  try {
    // generate the server-side rendered html
    const html = await renderModuleFactory(AppServerModuleNgFactory, options);
    response.send(html);
  } catch (e) {
    console.log(e);
    response.status(500).send("¯_(ツ)_/¯");
  }
});

const PORT = process.env.PORT || 3022;
app.listen(PORT, () => {
  console.log(`Listening on ${PORT}...`);
});
You’re done!
You’ve done it. The tedious part is over. The configuration. The build files. The server. You have a bonafide Angular Universal site. Now you just have to worry about deployment.
A note on performance
This is not the most performant way to deliver your site. Delivering files from a single server in a single location will incur high latency for most users. Your files can travel only at a fraction of the speed of light and will incur network overhead as well. The fastest way to deliver your site is to get as close to the user as possible. This is what a CDN does.
A CDN places your assets physically close to the user by copying them in edge servers across the world. Every user will have the files served from an edge near them.
I deploy my Angular Universal sites (well, all my sites) to Firebase Hosting. Firebase Hosting is backed by a CDN and it handles asset deployment, CDN cache purging, and all the other complicated things.
In the next article I’ll cover how deploy and deliver your Angular Universal site on Firebase Hosting.
Outline
- Angular Universal is two parts
- Part One: The universal bundle
- Install the Angular CLI
- Set up a minimal project
- Install platform server
- Make the browser module aware of a server transition
- Create an AppServerModule
- Create an entry point for the server module
- Set up the server module’s TypeScript configuration
- Tell the CLI how to build the universal bundle
- Now build it
- Part Two: The server
- Configure the server code for TypeScript
- Build the browser app
- Install express
- Set up the express app
- Require the assets for Angular Universal
- Server-side render your Angular app
- Build and run the server
- Open the browser and view source
- What if you don’t see your content?
- Inspecting 404s
- Delivering static assets
- You’re done!
- A note on performance