I spent a fair amount of time in 2021 building sites with Eleventy (11ty). I’ve become proficient, efficient, and comfortable. But when I look back at the first day I took on the challenge of learning a new system, I can remember how different it all felt.
The first few days were an absolute struggle and the first few weeks still felt uncomfortable. This is not a sleight at 11ty, because learning any new tool feels this way. In this post I’m going to detail the things I learned that will help you get past the learning curve a lot sooner.
1. Get comfortable with 11ty’s configuration
This is by far the best piece of advice I could give to anyone getting started with 11ty.
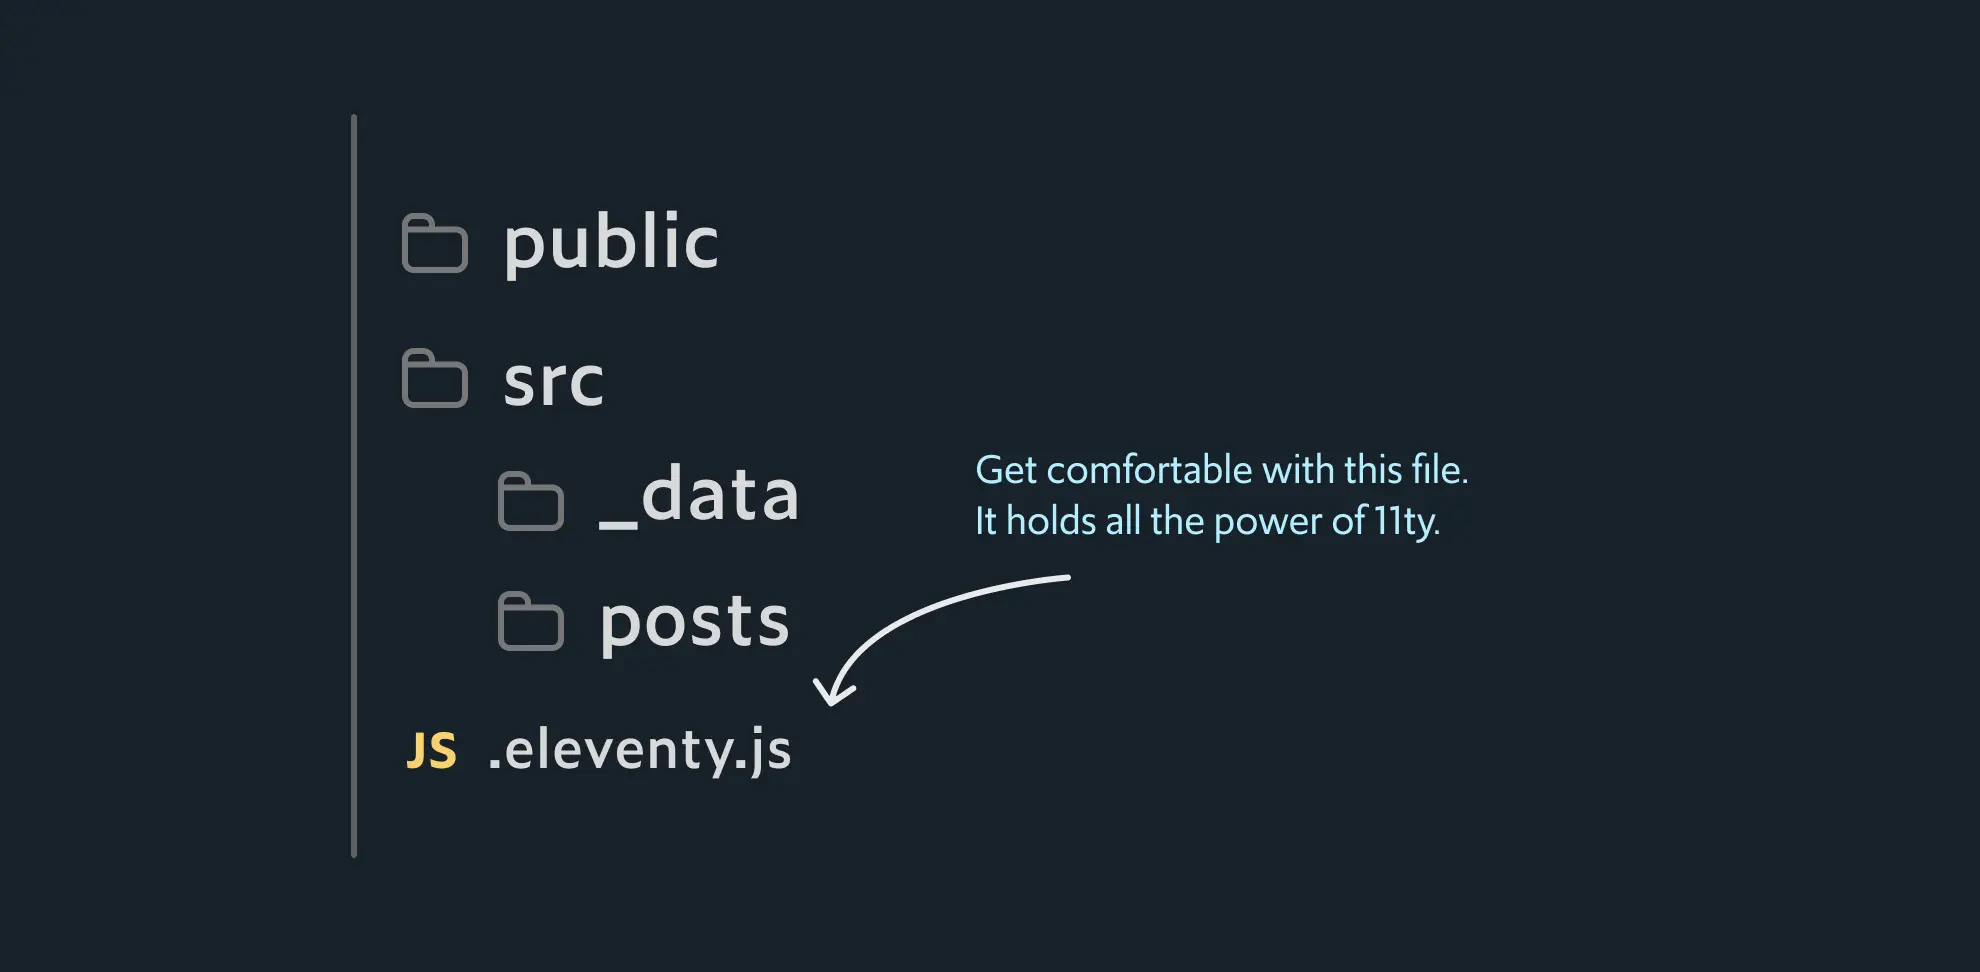
Your site’s custom configuration lives in the .eleventy.js file. This felt daunting at first because so many samples you’ll see are filled large config files. As you build your site though, you’ll learn that a lot of the configuration organically happens over time. What’s important to know, is to take a step back from “site development” mode and take the time to learn how 11ty’s configuration works. The whole process is simple at its core.
module.exports = eleventyConfig => {
  // Use the eleventyConfig object's built in methods to customize
};
The config object eleventyConfig has built-in methods for common actions. Need to copy a file over to your output directory? Use the addPassthroughCopy method.
module.exports = eleventyConfig => {
  // copy an entire folder!
  eleventyConfig.addPassthroughCopy("assets");

  // copy a file but rename it!
  eleventyConfig.addPassthroughCopy({
    "node_modules/prism/prism.css": "styles/prism.css"
  });

  // copy using glob patterns!
  eleventyConfig.addPassthroughCopy("fonts/**/*.woff2");
}
By default, 11ty will watch for template changes while serving and refresh accordingly. However, 11ty isn’t aware of every file type. But that’s okay. The configuration gives you the power to watch any file with addWatchTarget.
module.exports = eleventyConfig => {
  // copy an entire folder!
  eleventyConfig.addWatchTarget("assets");
};
The main idea is that configuration is a vital skill when developing with 11ty. The more comfortable you are with the config file, the more capable you’ll feel as you develop your site. For most of my 11ty projects, I like to set up a set of base configurations.
2. Set a source folder and an output folder
11ty will look for files at your root folder if you don’t specify a dir in the configuration.

module.exports = eleventyConfig => {

  // ... other 11ty config

  return {
    dir: {
      input: "src",
      output: "public",
    },
    templateFormats: [ "md", "njk", "html", ],
  };
};
I find that as your site grows you’ll want some separation at the root level of your project. I like to keep things scant and reserve the root folder for dependency management files (package.json), project description files (README.md, LICENSE.md), and any helpful documentation.
I also prefer to rename the default _site output directory to public because it fits well with Firebase Hosting. I recommend you choose the name that works idiomatically with your provider of choice.
3. Configure markdown for Nunjucks syntax
Markdown is probably one of the reasons you’re attracted to 11ty in the first place. It’s nice to use concise syntax to focus on your writing rather than wrangling with tags. Markdown’s simplicity will make life harder when trying to do some simple “if-then” or “for-each” style templating. Fortunately, 11ty’s all-mighty configuration allows you to use Nunjucks syntax in markdown.
module.exports = eleventyConfig => {

  // ... other 11ty config

  return {
    dir: {
      input: "src",
      output: "public",
    },
    templateFormats: [ "md", "njk", "html", ],
    markdownTemplateEngine: "njk",
    htmlTemplateEngine: "njk",
    dataTemplateEngine: "njk",
  };
};
The snippet sets the markdownTemplateEngine, htmlTemplateEngine, and dataTemplateEngine to have Nunjucks templating ability. In what cases do you need Nunjucks style templating in HTML, Markdown, or data files? It’s really helpful when you embrace 11ty’s Data Cascade.
4. Supercharge markdown with containers and classes
One of my grievances of markdown is the lack of classes and containers. But that’s fixable! markdown-it is a plugin-rich library. With some config tuning, you can apply classes and containers to your markdown on the fly.
These customizations are powered by two markdown-it plugins: markdown-it-attrs and markdown-it-container.
markdown-it-attrs allows you to add attributes onto markdown tags on the fly.
# Headline {.text-5xl}
markdown-it-container allows you to use a container other than a p tag. If you customize the plugin a bit more, you can even make it easy to specify classes on that container.
:::
hero # Headline {.text-5xl}
:::
In .eleventy.js you can specify the markdown engine of your choice and any customizations you wish to add.
function configureMarkdownIt() {
  // Reference: https://github.com/markdown-it/markdown-it-container/issues/23
  return require("markdown-it")({ html: true })
    .use(require('markdown-it-attrs'))
    .use(require('markdown-it-container'), 'dynamic', {
      validate: function () { return true; },
      render: function (tokens, idx) {
        const token = tokens[idx];
        if (token.nesting === 1) {
          return '<div class="' + token.info.trim() + '">';
        } else {
          return '</div>';
        }
      }
    });
}

module.exports = eleventyConfig => {

  // Set the markdown configuration in 11ty
  eleventyConfig.setLibrary("md", configureMarkdown());

  return {
    dir: {
      input: "src",
      output: "public",
    },
    templateFormats: [ "md", "njk", "html", ],
    markdownTemplateEngine: "njk",
    htmlTemplateEngine: "njk",
    dataTemplateEngine: "njk",
  };
};
Another tip is to set html: true in the configuration, as this will allow you to write HTML in your markdown. I find this helpful in “break the glass” kind of situations where you just need something done. If you’re on a team this whole section may start a debate, but if you’re going solo for your site there’s a lot of freedom to be had here.
5. Embrace the Data Cascade
11ty is a coordinator between the templates you write (.njk, .md, .liquid, etc…) and the data you need to process through these templates.
11ty has a concept of a “Data Cascade”. You can retrieve data in various ways at build time and use it within a template. This is a “pre-fetch” mindset and it’s great for data you know you need.
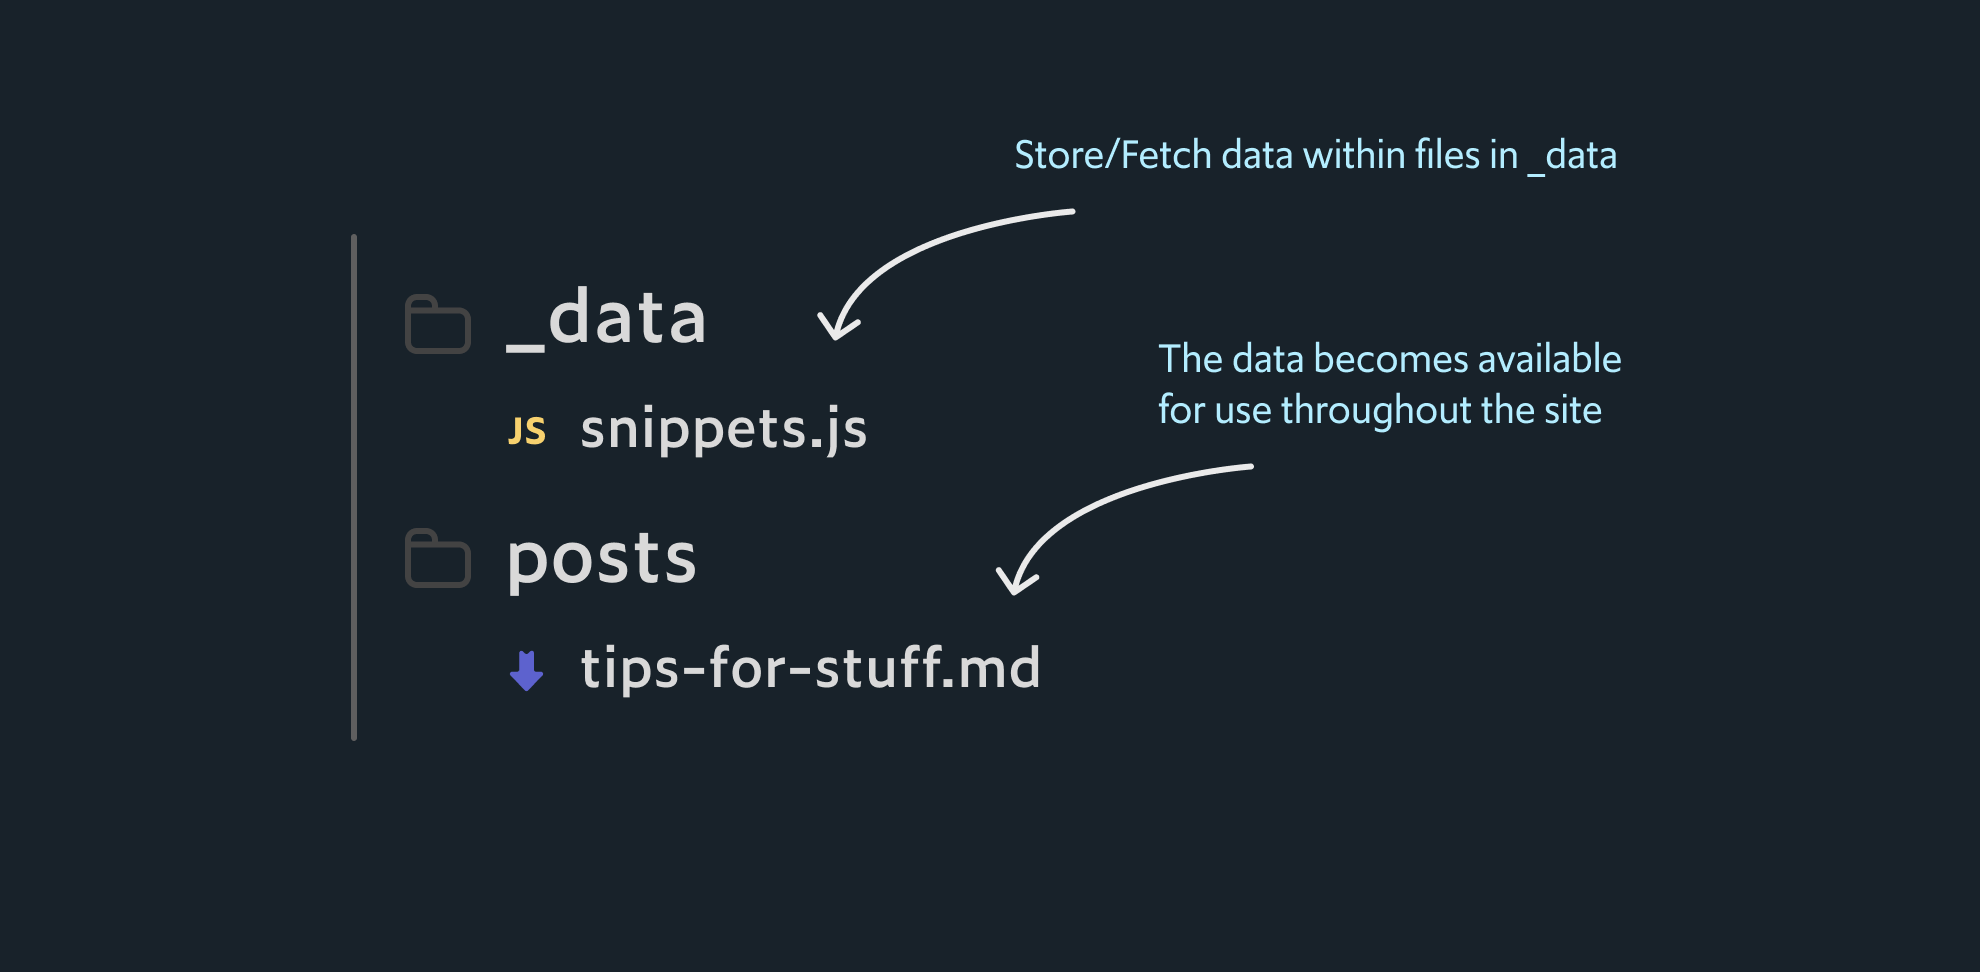
The Data Cascade starts with the _data folder. This folder is created at the root of your src folder. Within the _data folder, you can create files that can store static data or code to dynamically retrieve data when your site builds.
  [
    "Make personal website",
    "Draft blog post",
    "Rebuild personal website",
    "Write blog post",
    "Don't rebuild personal website"
  ]
11ty’s uses a file-based convention throughout the framework. Since the file name is goals.json, the data is available in a template as goals.
# Things I need to do

<ul>
{% for goal in goals %}
  <li>{{ toal }}</li>
{% endfor %}
</ul>
That’s just a simple static example. What if we want to do something more complicated. What if we want to do something that requires fetching data over the network?
Let’s say you want to reference a code sample from GitHub. The sample below is a small amount of code for being able to fetch any public file on GitHub.
import { fetch } from 'node-fetch';

// Make it easy to just pass the github path rather than the
// full API URL
function githubUrl(githubPath) {
  return `https://raw.githubusercontent.com/${githubPath}`;
}

// Get the code from GitHub given a repository and path
async function fetchCode(githubPath) {
  const response = await fetch(githubUrl(githubPath));
  const code = await response.text();
  return { githubPath, code }
}

async function createSnippetMap(snippetList) {
  const snippets = await Promise.all(snippetList);
  const snippetMap = {};
  snippets.forEach(({ githubPath, code }) => {
    snippetMap[githubPath] = code;
  });
  return snippetMap;
}

module.exports = createSnippetMap([
  fetchCode('davideast/eleventy-include-github-code/main/index.js'),
  fetchCode('davideast/eleventy-include-github-code/main/github.js'),
]);
The sample above retrieves a file in GitHub from their public API: no API Key needed! Nearly all of this code is just a regular node script. The only piece that 11ty needs to know about is in the module.exports section. This is what 11ty looks for at build time for adding your data to the “Data Cascade.”
Once you’ve hooked up this global data script (_data/snippets.js), you can reference the data in any template downstream.
---
layout: default.md
title: What a great blog post
---

Here is some sample code. It is good:

{{snippets['davideast/eleventy-include-github-code/main/index.js']}}
The snippets object is available because of the file name: _data/snippets.js. Its contents are the data retrieved from the function createSnippetMap(). To simplify the process, 11ty will automatically await the data assigned in module.exports. This allows you to synchronously access the data in your templates.
If you want to scope what templates the snippets object is available from, you can use special files within a specific directory. Instead of a global _data/snippets.js directory, you could scope it to a specific blog folder. 11ty will look for files named [dirname].11ty.js or [dirname].11ty.json at build time. The data returned from those scripts are available only for the templates within that folder.
The pre-build “Data Cascade” is great for generating content from data. However, the catch is you need to know about this data ahead of time. You’re not always going to want to create a big manifest file to represent the data to fetch. Sometimes it’s nice to be able to fetch the data on-demand within a template. For those cases, you can use async shortcodes.
6. Async shortcodes are for dynamic data fetching
Another way to retrieve data is with async shortcodes. They are great for “on-demand” fetching. Think of components that can take in an API endpoint, fetch the data, and then create the template.
### Here is my good code sample
{% github path="user/repo/branch/file.js" %}
This is another place where you can flex the config file. 11ty lets you create your own template helpers known as shortcodes. Think of shortcodes as custom functions in your template. You pass it values and it gives you back some value.
Async shortcodes are special because well, they’re asynchronous. This means you can do complex async operations and return them back in your template. The most common operation is fetching data over the network. We can repurpose the example from before to use async shortcodes to have a “github” helper.
// Pretend the code above has been refactored to be exported
const { fetchCode } = require('./src/fetch-code');

module.exports = eleventyConfig => {
  // Example: {% github path="user/repo/branch/file.js" %}
  eleventyConfig.addNunjucksAsyncShortcode('github', async function({ path }) {
    const { code } = await fetchCode(path);
    return code;
  });
}
# I'm writing a code blog post

I may not want to always preload the code example. So this
will run whenever the site builds.

{% github path="davideast/eleventy-include-github-code/main/index.js" %}
7. Use Eleventy Navigation
Eleventy Navigation is a plugin that allows you to generate your navigation components by setting the relationships in front matter. After that, it’s ready for use in the data cascade for templating. This is especially useful if you’re building a site that relies on hierarchy like a documentation site.
The first step is to set up the configuration using the configuration addPlugin method.
const eleventyNavigationPlugin = require("@11ty/eleventy-navigation");

module.exports = eleventyConfig => {
  eleventyConfig.addPlugin(eleventyNavigationPlugin);
};
Then it’s ready for use. To set navigation entries you specify the navigation key and order in a page’s front-matter.
---
eleventyNavigation:
  key: Home
  order: 0
---

# Home page

Welcome home
Above is the Home page. The order entry isn’t required, but you could override the numerical entry if needed. On another page, you specify a key as well. Again, you don’t need to increment the order.
---
title: About me
eleventyNavigation:
  key: About
  order: 1
---

# About me

I'm me!
Eleventy reads these entries at build time and creates a collection. Using Eleventy Navigation’s built-in filter you can generate navigation sections for a template.
<ul>
{%- for entry in collections.all | eleventyNavigation %}
<li>
  <a href="{{entry.url}}">
    {{entry.key}}
  </a>
</li>
{%- endfor %}
</ul>
That’s the simple use case for navigation. You can go further by specifying children for a route. This allows you to have navigation categories like you see in large documentation sites.
Resources for learning
There’s a ton of resources for learning 11ty. 11ty has a large community full of super nice and helpful people like Stephanie Eckles. The following links were helpful for me when starting the process.
11ty is powerful and full of different possibilities. Those possibilities mean working your way through lots of configuration and features. If you made it this far, I hope this helps you move faster past the learning curve.
Outline
- 1. Get comfortable with 11ty’s configuration
- 2. Set a source folder and an output folder
- 3. Configure markdown for Nunjucks syntax
- 4. Supercharge markdown with containers and classes
- 5. Embrace the Data Cascade
- 6. Async shortcodes are for dynamic data fetching
- 7. Use Eleventy Navigation
- Resources for learning